이번 시간에는 지난 시간에 이어서 사진을 찍고, 찍은 이미지를 서버에 업로드하는 과정을 해보자. 이전 포스팅의 코드와 거의 유사하므로 참고하면 좋겠다.
[Dev, flutter] 플러터로 iOS 앱 개발 시작하기 (3) - Camera, Gallery
이제 본격적으로 인터랙션을 지닌 샘플 앱을 만들어 보자. 먼저 해볼 것은 image picker의 사용이다. 사용을 하기 위해서는 main.dart 파일에서 image picker를 import 하는 것도 중요하지만 그전에 여러 가
dusanbaek.tistory.com
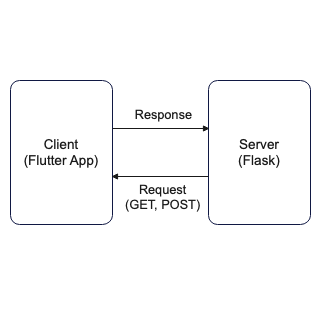
시작하기에 앞서 간단한 서버가 필요하다. Flask로 구성해 보자.

먼저 Web이라는 디렉터리를 만들고, 그 안에 uploads 폴더와 app.py 파이썬 파일을 생성한다. uploads 폴더에는 앱에서 보낸 이미지가 저장되고, app.py는 플라스크 서버를 열기 위한 코드이다.
app.py
import os
from flask import Flask, request
from werkzeug.utils import secure_filename

app = Flask(__name__) # 앱 생성

UPLOAD_FOLDER = 'uploads' # 같은 디렉토리 내 upload 폴더를 의미
app.config['UPLOAD_FOLDER'] = UPLOAD_FOLDER # 이 폴더를 업로드 폴더로 설정

@app.route('/', methods=['GET','POST']) # 앱의 root 디렉토리에 GET, POST 메서드를 사용
def upload_file():
    if request.method == "GET": # 웹을 열거나 GET을 호출 시 'ok'를 반환
        return "ok"
    else: # POST를 하면 image 파일을 안전한 파일 이름으로 감싸서 업로드 폴더에 전송
        file = request.files['image']
        if file:
            filename = secure_filename(file.filename)
            file.save(os.path.join(app.config['UPLOAD_FOLDER'], filename))
            return "ok"

if __name__ == '__main__':
	# 테스트를 위해 모든 IP 주소에서 접근 가능하게 하고 port number는 8000 으로 설정
    app.run(host='0.0.0.0', port=8000, debug=True)
이 파이썬 파일을 실행하여 웹 서버를 연다.
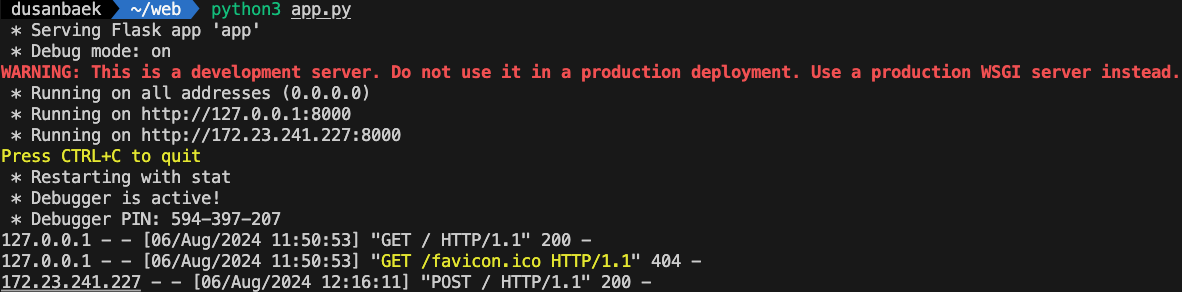
그러면 서버를 연 내 로컬 머신의 IP 주소 (172.23.241.227)를 확인할 수 있다. 여기로 이미지를 전송해야 하기에 꼭 필요한 값이다. 실행하고 나서 8000번 포트로 웹을 열어보면

GET 요청을 잘 처리하여 'ok'가 반환되었음을 알 수 있다.
라이브러리, 권한 설정

지난번 포스팅에 썼던 코드를 조금 수정하여 기능을 실행해 보자. 먼저 네트워크 요청을 허용하는 설정을 info.plist에 추가해 준다. 보안 문제로 인해 이 설정을 추가하지 않으면 런타임 에러가 발생한다.

이어서 dio 의존성을 추가해 준다. dio 패키지는 http 요청을 보내고 응답을 처리하는 데 효율적인 생산성을 제공해 주는 라이브러리다.
upload image
  // 이미지를 업로드하는 함수
  Future<void> _uploadImage() async {
    if (_image == null) {
      return;
    }
    Dio dio = new Dio();
    try {
      dio.options.contentType = 'multipart/form-data';
      var formData = FormData.fromMap({'image': await MultipartFile.fromFile(_image!.path)});
      final response = await dio.post('http://172.23.241.227:8000/', data: formData);
      print('성공적으로 업로드했습니다');
    } catch (e) {
      print(e);
    }
  }
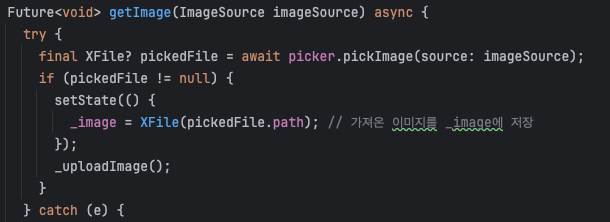
지난번 getImage 메서드처럼 편의를 위해 새로운 메서드 _uploadImage()를 정의해 준다. 해당 메서드를 실행하면 _image의 경로로부터 데이터를 받아와서 앞서 확인한 내 로컬 머신의 IP 주소를 통해 POST를 진행한다.
간단한 구현을 위해, 카메라로 사진을 찍거나 앨범에서 사진을 불러왔을 때 이 이미지를 바로 서버에 전송하는 코드를 사용한다.

코드를 실행해 보면 에뮬레이터의 앨범 속 기본 사진이 잘 전송되었음을 확인해 볼 수 있다.
코드 전체 보기
import 'dart:io';
import 'package:flutter/cupertino.dart';
import 'package:image_picker/image_picker.dart';
import 'package:dio/dio.dart';

void main() {
  runApp(const MyApp());
}

class MyApp extends StatefulWidget {
  const MyApp({Key? key}) : super(key: key);

  @override
  State<MyApp> createState() => _MyAppState();
}

class _MyAppState extends State<MyApp> {
  XFile? _image; // 이미지를 담을 변수 선언
  final ImagePicker picker = ImagePicker(); // ImagePicker 초기화

  // 이미지를 가져오는 함수
  Future<void> getImage(ImageSource imageSource) async {
    try {
      final XFile? pickedFile = await picker.pickImage(source: imageSource);
      if (pickedFile != null) {
        setState(() {
          _image = XFile(pickedFile.path); // 가져온 이미지를 _image에 저장
        });
        _uploadImage();
      }
    } catch (e) {
      print('Error picking image: $e');
      showCupertinoDialog(
        context: context,
        builder: (context) {
          return CupertinoAlertDialog(
            title: Text('Error'),
            content: Text('Unable to pick image: $e'),
            actions: [
              CupertinoDialogAction(
                child: Text('OK'),
                onPressed: () {
                  Navigator.of(context).pop();
                },
              ),
            ],
          );
        },
      );
    }
  }

  // 이미지를 업로드하는 함수
  Future<void> _uploadImage() async {
    if (_image == null) {
      return;
    }
    Dio dio = new Dio();
    try {
      dio.options.contentType = 'multipart/form-data';
      var formData = FormData.fromMap({'image': await MultipartFile.fromFile(_image!.path)});
      final response = await dio.post('http://172.23.241.227:8000/', data: formData);
      print('성공적으로 업로드했습니다');
    } catch (e) {
      print(e);
    }
  }

  @override
  Widget build(BuildContext context) {
    return CupertinoApp(
      home: CupertinoPageScaffold(
        navigationBar: CupertinoNavigationBar(
          middle: Text("Camera Test"),
        ),
        child: SafeArea(
          child: Column(
            crossAxisAlignment: CrossAxisAlignment.center,
            children: [
              SizedBox(height: 30, width: double.infinity),
              _buildPhotoArea(),
              SizedBox(height: 20),
              _buildButton(),
            ],
          ),
        ),
      ),
    );
  }

  Widget _buildPhotoArea() {
    return _image != null
        ? Container(
      width: 300,
      height: 300,
      child: Image.file(File(_image!.path)), // 가져온 이미지를 화면에 띄워주는 코드
    )
        : Container(
      width: 300,
      height: 300,
      color: CupertinoColors.systemGrey,
    );
  }

  Widget _buildButton() {
    return Row(
      mainAxisAlignment: MainAxisAlignment.center,
      children: [
        CupertinoButton(
          color: CupertinoColors.activeBlue,
          onPressed: () {
            getImage(ImageSource.camera); // getImage 함수를 호출해서 카메라로 찍은 사진 가져오기
          },
          child: Text("카메라"),
        ),
        SizedBox(width: 30),
        CupertinoButton(
          color: CupertinoColors.activeBlue,
          onPressed: () {
            getImage(ImageSource.gallery); // getImage 함수를 호출해서 갤러리에서 사진 가져오기
          },
          child: Text("갤러리"),
        ),
      ],
    );
  }
}'Dev > flutter' 카테고리의 다른 글
| [Dev, flutter] 플러터로 iOS 앱 개발 시작하기 (6) - PageView (2) | 2024.08.09 |
|---|---|
| [Dev, flutter] 플러터로 iOS 앱 개발 시작하기 (5) - STT, TTS (2) | 2024.08.08 |
| [Dev, flutter] 플러터로 iOS 앱 개발 시작하기 (3) - Camera, Gallery (3) | 2024.08.05 |
| [Dev, flutter] 플러터로 iOS 앱 개발 시작하기 (2) - Image (1) | 2024.08.05 |
| [Dev, flutter] 플러터로 iOS 앱 개발 시작하기 (1) - Widget (3) | 2024.08.03 |